.png)
Campfire Modelling V1 Parts 1>24

APEX3D Modelling Tutorial
Today, I learnt to model a campfire using a speed modelling video I slowed down the
video thus to follow along. I didn’t know much about modelling items at that moment.
Rocks
Modelling
I started by creating a Polygon Cube, to make rock for the fire, with the Subdivision of 3x3x3 and scaled the cube up for a better view.

The video showed me that I also needed to generate a polygon sphere therefore to Shrink-wrap
(Deform>ShrinkWrap) the cube around the sphere, it took me a while to find this property.
Subsequently, I deleted the History of the polygons (Edit>Delete by Type>History), as it stops an
object periodically prevents anything weird or wrong happening (stops the crashing of computer /
software by excessive data usage). Deleting the sphere leaving the shrink-wrapped cube that I could
mould it without the cube having a Pole like the sphere but still being a round polygon.

Following making the software duplicates the new Cube-Sphere 4 times to have the same properties, to give the rock circle campfire four different variants to use around the ring.

Sculpting
The Cube-Spheres needed smoothing out (Mesh>Smooth) to make it easier to mould the rocks using the Sculpting Toolkit. I was having a few problems understanding how to use the Sculpting Tools, for changing the size of the brush. After a few attempts, I realised I needed to double click on the Active Foamy Tool icon (under the scale button).


Once, figuring out the Sculpting Tools properties; I pulled at the smoothened Cube-Spheres to give them the shape of rocks. I learnt more about the sculpting tools in the Fish Tank Modelling lecture.

I don’t know quite why the rocks turned very spiky and didn’t look anything like forest rocks.

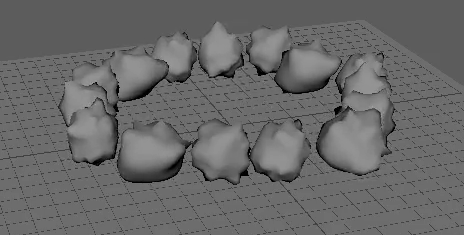
Rock Circle MASH (V1)
When finished sculpting the rocks, I made a MASH Network (MASH> Create MASH Network), therefore to get the software to replicate the four different rocks in various formations


In the MASH1_ID > ID Count, I changed the identification number to 4 as a result for the computer to understand that I want to use the four different rocking in the replication.

I essentially had to change the distribution of the rocks to Radial (MASH_Distribute > Distribution Type: Radial), to make the rocks become a circle. However the Radial’s default was a vertical layout and I required a horizontal one.


To alter this situation, was to convert the Radial Axis from XY > ZX, to allow the rocks to lie down flat on the grid.


To get the four rocks into a complete circle, I increased the Number of Points to increase the number of rocks
(as seen in the image).

I also altered the digits of the Radius to expand and retract how far apart the rocks were next to each other in the circle. I followed by changing the Number of Points, Radius, and Scale of the rocks to get the desired look I was after for the rock circle.

Subsequently, I added a Tranform Node to the rock circle an with this I could raise the rocks’ position by 2.500 on the Y axis. When I attach a Dynamic Node, it would give the rocks gravity therefore to fall from this height.


To provide the rocks with gravity, I had to alter the Physical Properties in the Dynamic Node by increasing the Friction (So the rocks won’t slide around the ground when they collides with it).


Now I was required to set up the plane polygon for collision for the rocks to hit and not fall straight through the ground plate. After adding the Dynamic Node, a MASH1_BulletSlover would appear and this is where I would set up the collision ability by dragging the Plane Polygon into the Collider Objects.


These two nodes (Transform & Dynamic) would make the rocks fall erratically against the ground to make them look like they’ve been placed in the circle in the forest. I keep changing the properties of the nodes to make them fall in different ways for certain looks.
That’s where I finished version 1...